I set up a Media Server with Urve Pi, Nginx, and a Dynu dynamic DNS (Part 1)
AMartin1987 | Published on: Sept. 20, 2025, 11:40 p.m.
These are the steps I followed to set up a server over the internet on my Urve Pi, so I could share media like movies with my family over the internet.
So, my parents (who are not technologically savvy) needed a very simple solution to watch media that I wanted to share with them on their old smart TV. The solution had to be:
a) lightweight and compatible with older hardware,
b) straightforward, with as few steps as possible.
That’s why I didn’t go with full-fledged media server software like Plex or Jellyfin. Instead, I decided to serve the video files directly from a folder that could be accessed just by entering a URL and a username-password combination.
These are the tools I used:
- My Urve Pi (an ARM64 single-board computer) connected 24/7 to the router via Ethernet.
- A MicroSD card installed to host the media files (A2 V30, with read speeds up to 190MB/s and write speed up to 130MB/s, more than enough to buffer video over the internet without lag).
- An SSH connection (Secure Shell, a protocol that allows secure remote login and command execution over an encrypted channel) from a powershell in my PC to apply settings
- Docker (a platform that allows applications and services to run inside lightweight, isolated containers)
- A web server (Nginx, a high-performance open-source web server often used as a reverse proxy, load balancer, and HTTP cache).
- A free dynamic DNS (Dynu, a DDNS service that updates a domain name to always point to your current home IP, even if it changes) to make it accessible from anywhere on the internet..
Step 1: Preparing the Urve Pi
To start, I prepared my Urve Pi. I installed an ARM64 version of Debian 11 and connected it directly to my router via Ethernet to ensure a stable connection. After that, I updated all packages with apt update && apt upgrade and enabled SSH so I could manage the Pi remotely from my PC using PowerShell. This way, I didn’t have to keep a monitor and keyboard attached to the Pi.
Step 2: Preparing the media storage
I inserted a fast MicroSD card (A2 V30, up to 190MB/s read, 130MB/s write, more than enough to stream video over the internet without buffering) into the Urve Pi to host all the media files. Initially, I tried exFAT, but I couldn’t find compatible packages for Debian 11 on ARM64, so I decided to format the card as NTFS, which is supported by both Windows and Linux systems and allows for large file sizes.
To mount and manage the NTFS filesystem, I installed the packages on the Urve Pi ntfs-3g and libntfs-3g883 (read/write NTFS driver for FUSE, a Filesystem in Userspace framework that allows non-privileged users to mount filesystems)
I then created a folder for media: /mnt/microsd/Medios_de_Ale, where all movies and series would be stored. I also ensured the folder had proper read permissions so that any web server (like Nginx, which I would set up later) could access the files.
Step 3: Setting up DDNS
Then, I set up a Dynu dynamic DNS account to make the server accessible from anywhere. I chose Dynu because it offers a free account option and is simple to configure. To keep the hostname always up-to-date, I set up the Dynu DDNS updater on the Urve Pi using a GitHub solution by a user (DoganM95, a lifesaver really!!) that is ARM64-compatible. Then I deployed a Docker container to automatically run this Dynu DDNS updater (a daemon – a background process that runs continuously without user intervention). This container checks for IP changes every 5 minutes and updates the DNS record automatically, keeping the hostname always pointing to my current IP. This ensures visitors can always access the page using the same URL without worrying about IP changes.
Step 4: Configuring port forwarding
Next, I configured port forwarding on the router to make the media server accessible from the internet. I reserved a static IP for the Urve Pi in the router settings so that it always keeps the same internal address. Then, I set rules to forward ports 80 (HTTP, the standard web traffic protocol) and 443 (HTTPS, HTTP with SSL/TLS encryption for secure connections) to the Urve Pi’s IP. This setup ensures that whenever someone types the Dynu hostname in a browser, the request reaches the Urve Pi directly. I also updated my SSH connection in Windows Terminal to use this static IP, allowing me to manage the Pi remotely at any time.
Step 5: Setting up Nginx
Initially, I tried installing Nginx in a Docker container, but I ran into issues configuring it properly with ports and SSL certificates (I spent hours fighting with this 😆 but yeah i'm still a noobie so don't judge me). To simplify the setup and have full control, I decided to install Nginx directly on the Urve Pi (not in Docker). I chose Nginx not only because it’s lightweight and reliable on ARM64 devices, but also because I wanted to practice using a tool that is widely used in larger web projects.
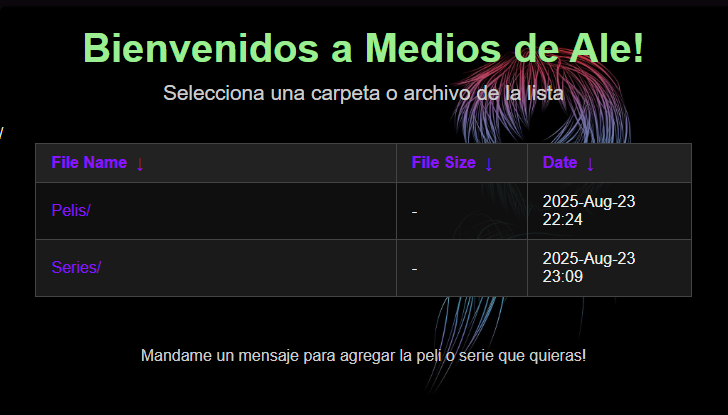
After installing Nginx, I set up the server to serve the media folder. To make the file listing more user-friendly, I enabled the Fancyindex module. Fancyindex replaces the default Nginx “autoindex” page with a visually organized listing of files and folders. It shows file names, sizes, and modification dates, and allows customization through CSS. I applied a simple CSS style and a background image to make the page look nicer and responsive for mobile access.
I did run into a tricky issue at first: Fancyindex conflicted with the standard autoindex on setting, preventing the files from displaying properly. After adjusting (for many hours 🥲) the Nginx configuration to enable Fancyindex while disabling the conflicting autoindex directive in the server block, I finally got the media files to list correctly.
To protect access, I set up HTTP Basic Authentication with a .htpasswd file, ensuring that only my family could see the media. Finally, I tested the server locally by visiting the Urve Pi’s IP in a browser to confirm that the folder contents were displayed correctly and that the authentication prompt appeared.
So, the page was already looking like this! Simple but effective 😎
In the next part, I’ll go through how I set up SSL certificates with Let’s Encrypt, added some customization to the page, and made the whole setup more secure against bot attacks 😺
Categories:
About me
My name is Alejandra and I'm learning to code to become a backend developer. I also love videogames, anime, animals, plants and decorating my home.
You can contact me at alejandramartin@outlook.com
You can also visit my portfolio.